Relevo User Manual
Real-world and procedural landscapes for 3ds Max 2023–2027 and Cinema 4D 2023.2 or later, with photoreal V-Ray looks. Version 1.1.0. Cinema 4D users: start with Relevo for Cinema 4D.
Quick start (5 minutes)
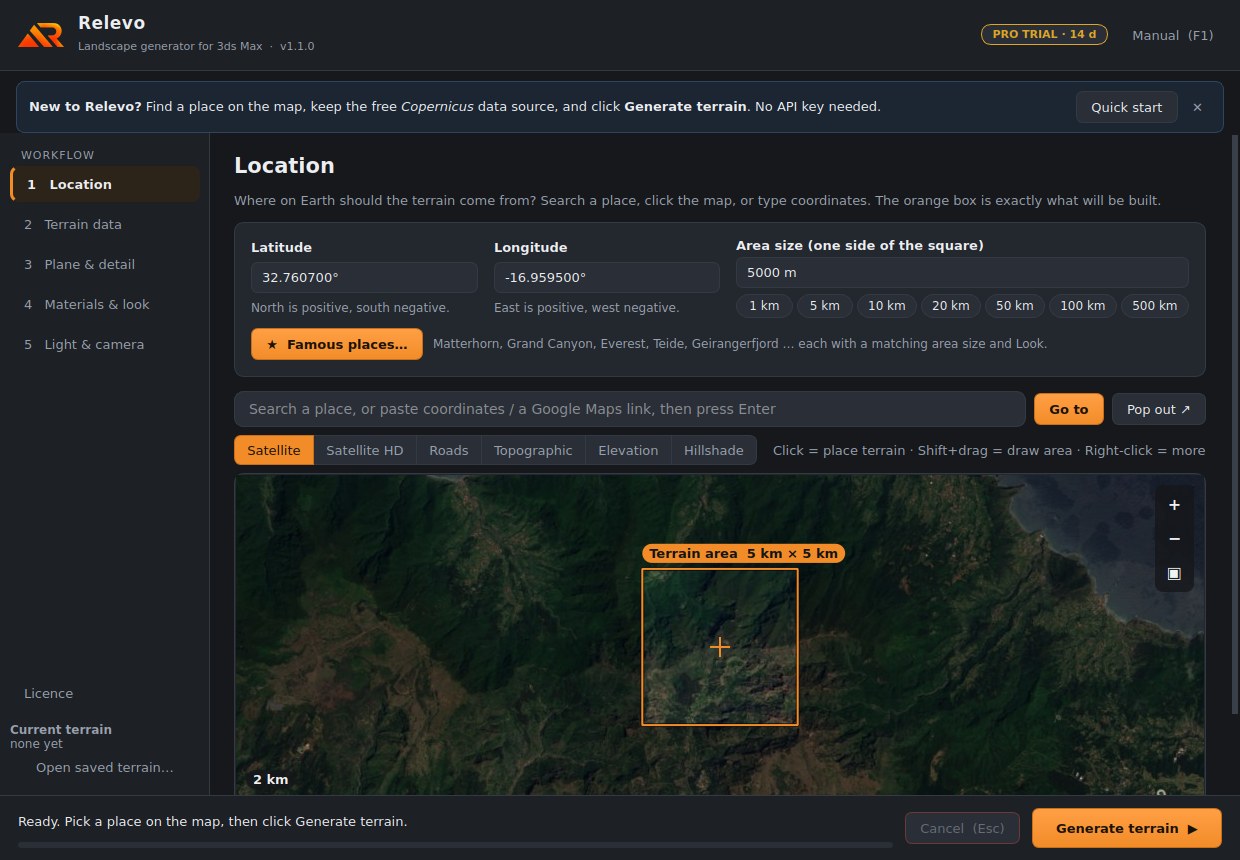
This builds a real mountain from free data with no API key, then makes it photoreal. The sidebar on the left lists the steps in order, and Cancel stops any step at any time.
- In 3ds Max, open Relevo > Relevo Panel.
- 1 Location: type a place in the search field (for example
Pico Ruivo, MadeiraorMatterhorn) and press Enter, or click anywhere on the map. The orange box is exactly what will be built. Use the 1 km … 20 km buttons to set its size; 5 km is a good first size. - 2 Terrain data: leave Real-world data selected, with Elevation source set to Copernicus 30 m — free, worldwide, no key and Satellite photo set to No photo.
- Click Generate terrain ▶ at the bottom right. The progress bar and status line show each step. A 5 km terrain takes about 10 to 40 seconds.
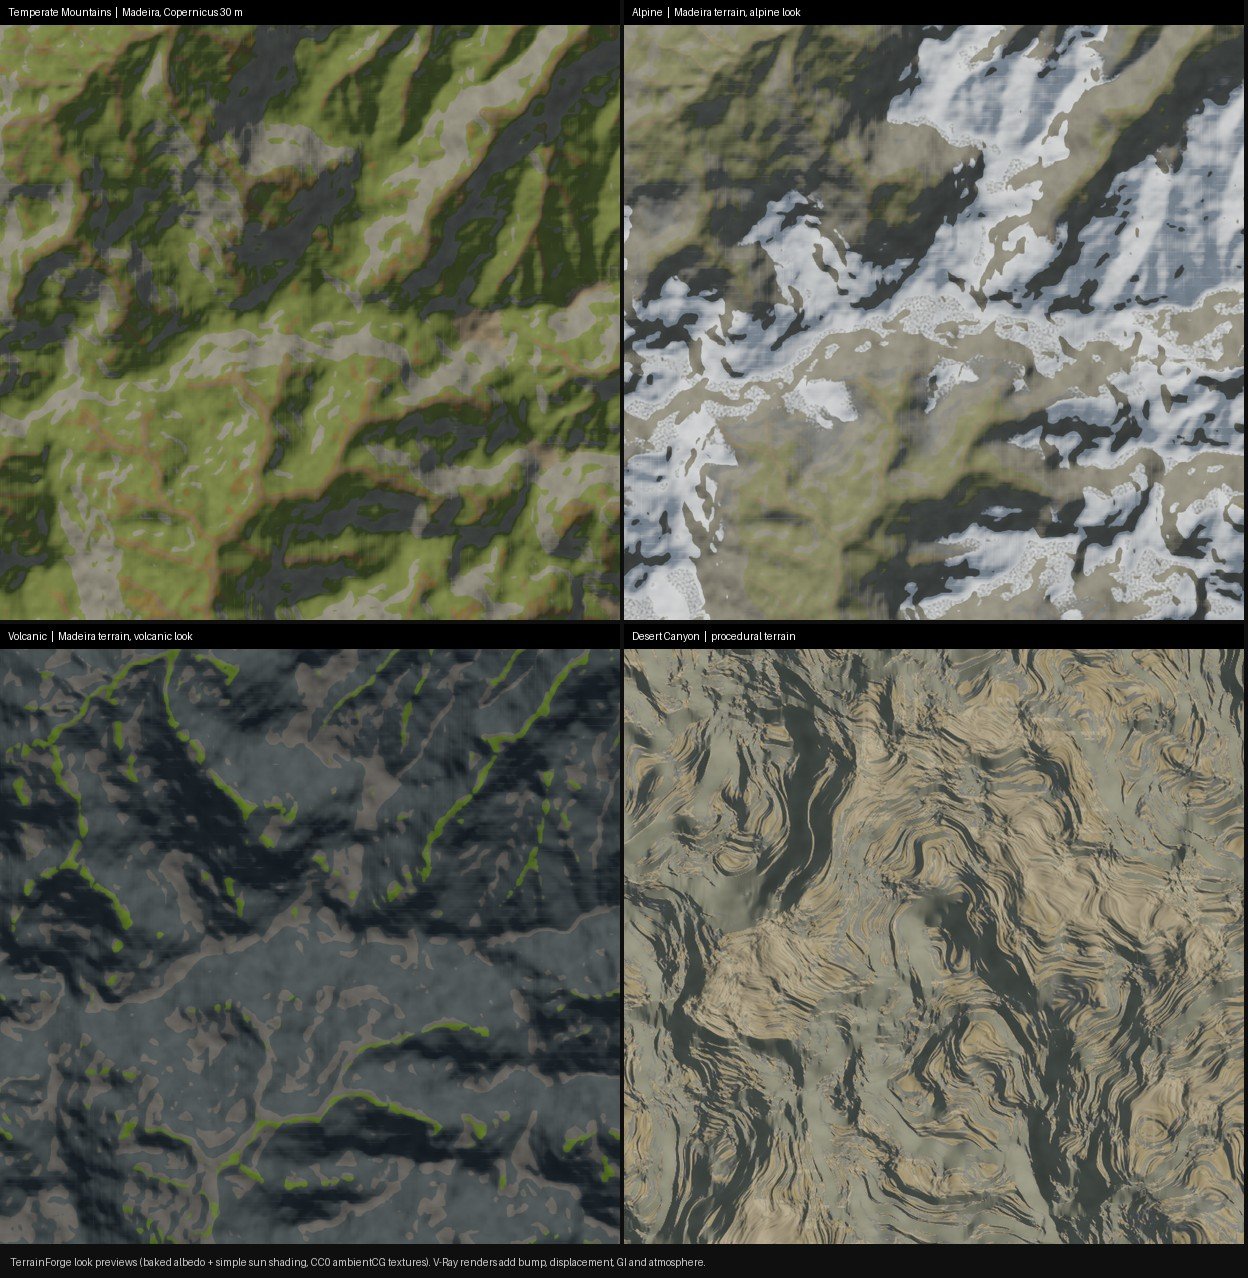
- 4 Materials & look: the first time only, click Download free CC0 starter pack. Then choose a look (for example Temperate Mountains) and click Apply look.
- 5 Light & camera: click Apply sun, sky and haze, then Create hero camera.
- Render with V-Ray (Shift+Q).
Install & uninstall
Requirements
- Windows 10 or 11, 64-bit, with 3ds Max 2023, 2024, 2025, 2026 or 2027. Each version has its own installer, and you can install several side by side.
- V-Ray 6 or 7 for 3ds Max, for the photoreal looks, sun and sky, and displacement. Without V-Ray, terrains still build, and looks are applied as a baked texture on a Physical Material.
- Chaos Scatter (included with V-Ray) is optional, for vegetation.
- An internet connection for real-world data, the map and the material download.
Install
- Close 3ds Max. The installer checks this and asks you to close it if it is running.
- Run the installer for your version, for example
Relevo_1.0.0_Max2026_Setup.exe. No administrator rights are needed: Relevo installs for your Windows user only. - Start 3ds Max. A Relevo menu appears in the main menu bar, next to Help.
- Run Relevo > Run Self-Test once. See Self-test.
Files are installed to %APPDATA%\Autodesk\ApplicationPlugins\Relevo_<version>.bundle, for example Relevo_2024.bundle. Your settings, licence and material library are kept in %APPDATA%\Relevo, and logs in %LOCALAPPDATA%\Relevo\logs.
Update
Close 3ds Max and run the new installer over the old one. Your settings, licence and materials are kept.
Uninstall
Use Windows Settings > Apps > Relevo for 3ds Max 2026 > Uninstall. The zip version has Uninstall.bat instead. Your materials and settings in %APPDATA%\Relevo are not deleted. Delete that folder by hand if you want to remove them too.
Self-test
Relevo > Run Self-Test checks the installation step by step:
- Python and the bundled libraries (NumPy, Pillow, GeoTIFF support);
- a small procedural terrain, built in the scene;
- whether the data servers can be reached;
- whether V-Ray is present.
It ends with a report and saves it to the log folder. If anything is red, the report says what to do. When you ask for support, send that report together with relevo.log. Relevo > Open Log Folder opens the folder with both files.
The panel
Header
Shows the licence badge (FREE, PRO TRIAL or PRO) and a Manual button. The manual opens at the page for the step you are on; F1 does the same.Sidebar
The workflow in order: 1 Location, 2 Terrain data, 3 Plane & detail, 4 Materials & look, 5 Light & camera, then Licence. Below the steps are the current terrain and Open saved terrain…Footer
The status line and progress bar, Cancel (Esc), and Generate terrain ▶, which is available from every step.Help under every control
Each setting has a short explanation under it. Hover over a button for more.Long jobs run in the background, so 3ds Max stays responsive while data downloads. Only the final step, building the objects in your scene, happens in the foreground, and it is a single undo step (Ctrl+Z removes the whole build).
Location & map
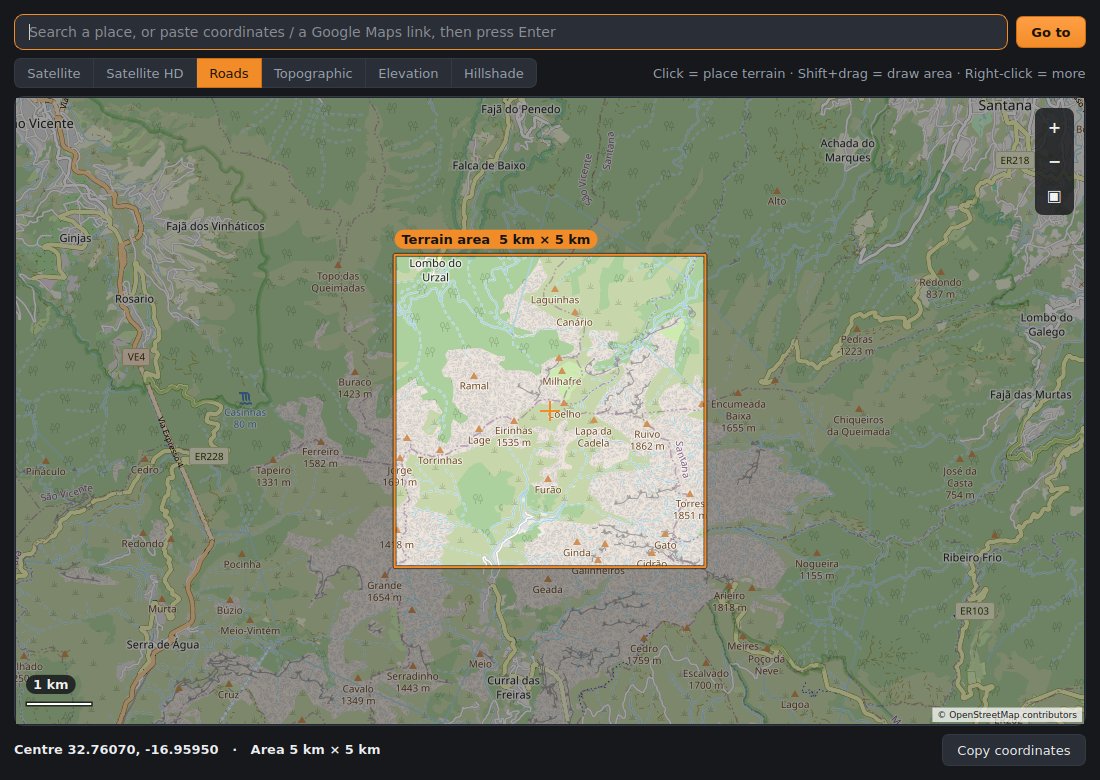
Step 1 Location has the map built in. Pop out ↗ (or Relevo > Map of the Area) opens the same map in a large window of its own. The map, the Latitude / Longitude fields and the Area size are always in sync.
Going to a place
- Search: type a place name (
Mount Teide,Grand Canyon), or paste coordinates (28.2724, -16.6425) or a Google Maps link copied from your browser. Then press Enter or click Go to. - Type coordinates in the Latitude and Longitude fields above the map. North and east are positive; south and west are negative.
- Click the map: the terrain centre moves to where you clicked. The nearest place name appears under the map.
| Mouse / key | Result |
|---|---|
| Click | Put the terrain centre here. |
| Shift + drag | Draw a new square area. This sets both the centre and the Area size. |
| Drag | Pan the map. |
| Wheel, double-click, + / -, the + − buttons | Zoom. The ▣ button zooms back to the terrain area. |
| Right-click | Menu: Build the terrain here, Copy coordinates (of the point under the mouse), Copy terrain centre, and zoom options. |
| Copy coordinates | Copies the terrain centre as lat, lng to paste anywhere. |
Map types
| Map | What it shows | Cost / key |
|---|---|---|
| Satellite | Cloud-free Sentinel-2 satellite mosaic, about 10 m per pixel. Best for seeing mountains, forests and coastlines. | Free |
| Satellite HD | Sharp Google satellite imagery, down to single buildings. | Your Google key with the Map Tiles API enabled; Google bills tile use |
| Roads | OpenStreetMap: roads, towns, names, paths. | Free |
| Topographic | OpenTopoMap: contour lines, peaks with heights, shaded relief. | Free |
| Elevation | Heights in colour (green lowland to white peaks) with shading. It is roughly what the terrain generator will see. | Free |
| Hillshade | Grey shaded relief. Ridges, valleys and cliffs stand out. | Free |
Famous places
On 1 Location, click ★ Famous places… to open a gallery of 62 landscapes around the world. Each has a satellite-and-relief thumbnail, an area size and a matching Look. Search by name, country or type ("volcano", "Norway", "canyon"), or filter by category: Mountains, Volcanoes, Canyons & deserts, Coasts & islands, Fjords & valleys. Double-click a place, or select it and click Use this place. The coordinates, area size and Look are filled in and the map jumps there, so you only need to click Generate terrain.
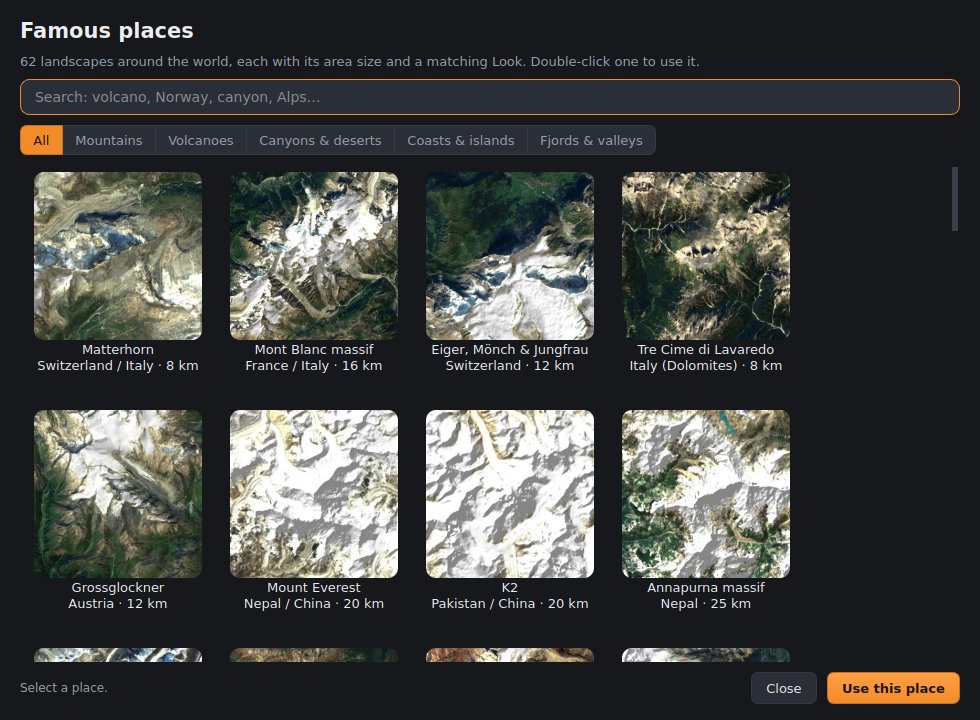
Every place was checked when the library was built: its coordinates against the OpenStreetMap geocoder, and its relief against real elevation data. The highest point of each area matches the real summit.
Terrain data
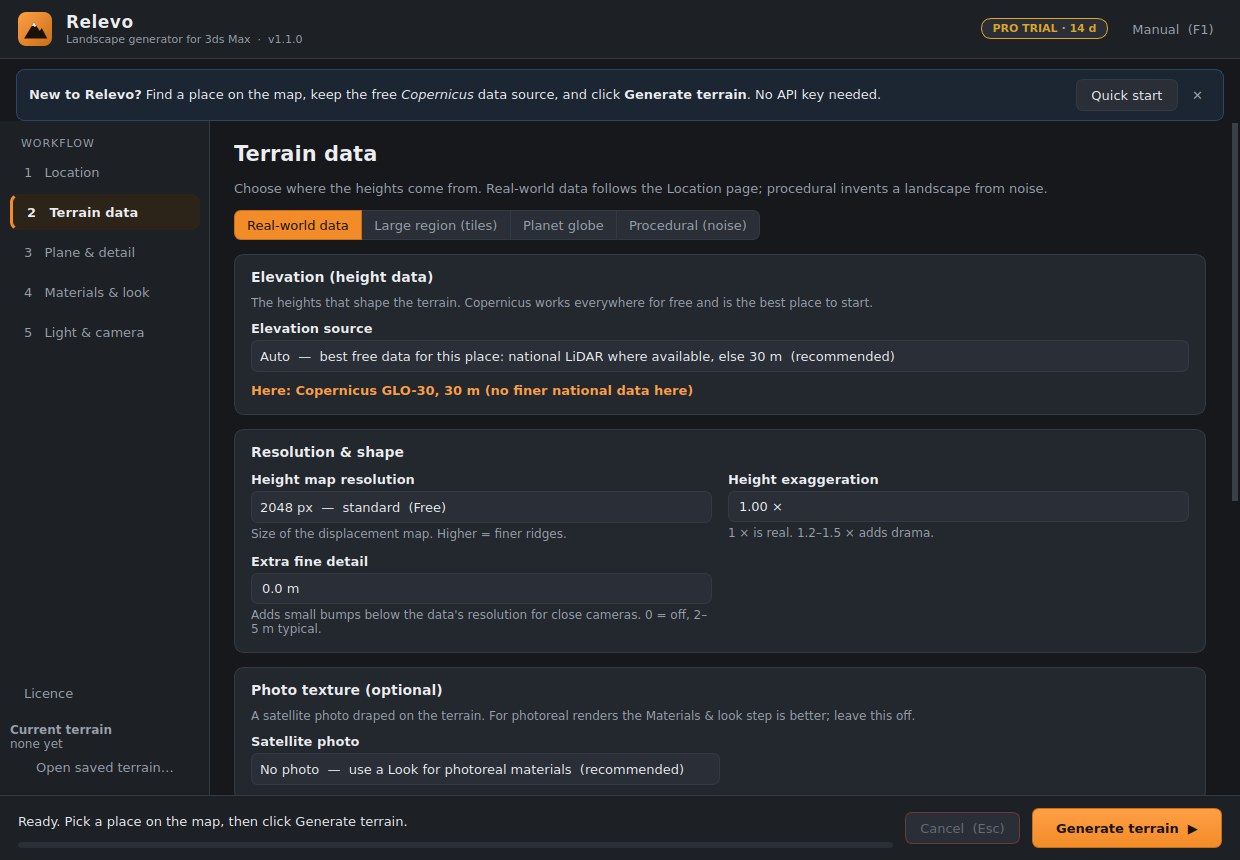
At the top of step 2 Terrain data, choose one of four modes. Only the settings that matter for your choice are shown.
- Real-world data: the place from step 1, up to 200 km.
- Large region (tiles): up to 1,000 km; see Large regions.
- Planet globe: see Planet globe.
- Procedural (noise): an invented landscape; see Procedural terrain.
| Setting | What it does | Good values |
|---|---|---|
| Elevation source | Where the heights come from. See the table below. | Auto |
| OpenTopography dataset | Shown for OpenTopography. 1 m LiDAR exists only in some regions. | USGS 1 m in the USA, else Copernicus |
| Your DEM files | Shown for "My own DEM". A GeoTIFF or a folder of tiles, in any projection. | |
| Elevation points per side | Shown for Google and AWS. How many heights are sampled across the area. | 256 (Google: 128 requests) |
| Height map resolution | Size of the displacement map. Above 2048 px needs Pro. | 2048 px, or 4096 px for close cameras |
| Height exaggeration | Multiplies heights. | 1 × is real; 1.2 to 1.5 × for drama |
| Extra fine detail | Adds small procedural bumps below the data's resolution, for close cameras. | 0 (off), or 2 to 5 m |
| Satellite photo | An optional Google satellite photo draped on the terrain. Looks (step 4) give better photoreal results. | No photo |
| OpenStreetMap | Downloads buildings, roads, water and land cover. It can shape the terrain to them (flat lakes, road beds) and build 3D meshes. (Pro) | On for towns and coasts |
Elevation sources
| Source | Key? | Resolution | Use it for |
|---|---|---|---|
| Auto | No | 0.5–30 m | Default. National LiDAR where available, else Copernicus. See Auto. |
| Copernicus 30 m | No | 30 m, worldwide | Mountains, valleys, anything larger than about 2 km. |
| AWS Terrain Tiles | No | 3 to 90 m, depending on region | Quick previews. |
| OpenTopography | Free key | Down to 1 m | Detailed close-ups where LiDAR exists. (Pro) |
| My own DEM / LiDAR | No | Whatever your files have | Survey data you already have. (Pro) |
| Google Elevation API | Google key | Varies | Only if your Google agreement allows building terrain from it (see Data). |
API keys
The API keys card holds the Google Maps key and the OpenTopography key.
- Show reveals the key while you type or check it.
- Test key checks the Google key against each Google API and tells you exactly what is missing.
- Tick Remember on this computer to keep a key for next time. It is saved for your Windows user in
%APPDATA%\Relevo\relevo.ini. Untick it to forget the key. Keys are never saved in your .max file.
Estimate downloads / API cost shows the number of requests before you generate. Paid requests are capped per job (2,000 by default), so a typo cannot run up a large bill.
Auto: the best free data for each country
The default elevation source, Auto, picks the most detailed free data for the place you chose. It uses national LiDAR where a country publishes it and Copernicus 30 m everywhere else. Under the drop-down, a line shows what Auto will use for the current location, for example "Here: swissALTI3D (Switzerland), ~2 m (gaps filled from Copernicus)".
| Country | Data | Detail | Licence (credit included automatically) |
|---|---|---|---|
| USA (incl. Alaska, Hawaii, Puerto Rico) | USGS 3D Elevation Program | 1–10 m | Public domain |
| Netherlands | AHN (Rijkswaterstaat) | 0.5 m | CC0 |
| Switzerland | swissALTI3D (swisstopo) | 2 m | Free open data, credit swisstopo |
| France | IGN RGE ALTI | 1 m | Licence Ouverte 2.0 |
| England | Environment Agency LiDAR composite DTM | 1 m | Open Government Licence v3 |
| Spain (mainland, Balearics) | IGN MDT05 | 5 m | CC BY 4.0 |
| Norway | Kartverket DTM | 1 m | CC BY 4.0 |
| Everywhere else | Copernicus GLO-30 | 30 m | Free, credit DLR/Airbus/ESA |
- Areas the national data does not cover, such as the sea or land across a border, are filled from Copernicus. Small holes, such as buildings removed from a terrain model, are interpolated from the surrounding ground.
- If a national service is down, Auto moves on to the next source and notes it in the log.
- National LiDAR is a Pro feature. On the Free tier, Auto uses Copernicus 30 m.
- For Switzerland, areas larger than about 9 km use the next available source, because swissALTI3D is delivered as many 1 km tiles.
Large regions (tiles)
For whole islands, mountain ranges or countries (up to 1,000 km), choose Large region (tiles) at the top of 2 Terrain data. Set the size with Area size on the Location page (50 km, 100 km, 500 km…); the map shows the tile grid.
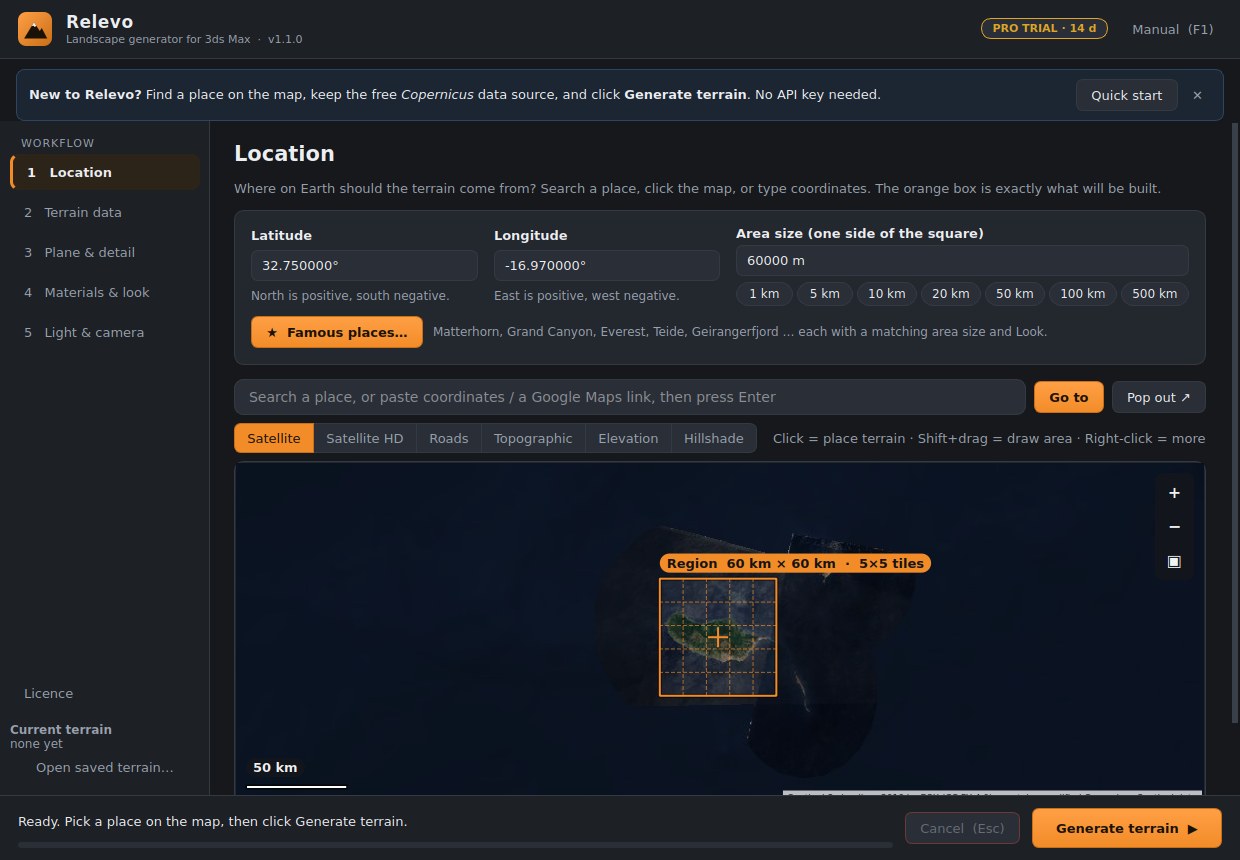
- Tiles: Automatic makes tiles of about 12 km, up to 10 × 10. Each tile becomes its own object,
RV_Region_r02c03and so on, on the layer Relevo Region. - Less detail further from the centre: the centre tiles get 2049 px height maps, then 1025 px, and the outer tiles 513 px. For tiles 60 m per pixel or coarser, Relevo downloads AWS Terrain Tiles instead of 30 m rasters, which keeps a 500 km region at a manageable download.
- No seams: tiles are laid out as true squares on a projection centred on the region. Their shared edges are stitched, so neighbouring tiles meet exactly, even when their detail differs.
- Earth curvature (optional) lowers the ground with distance from the centre: about 2 km at 160 km and 20 km at 500 km. Use it for long-lens horizon shots.
- 4 Materials & look > Apply look applies the look to every tile. Open saved terrain… rebuilds a saved region from its
<name>_region.jsonwithout downloading anything. - To keep dozens of tiles responsive, region tiles use at most 128 plane segments and no viewport smoothing. Detail comes from each tile's height map and render-time displacement.
Planet globe
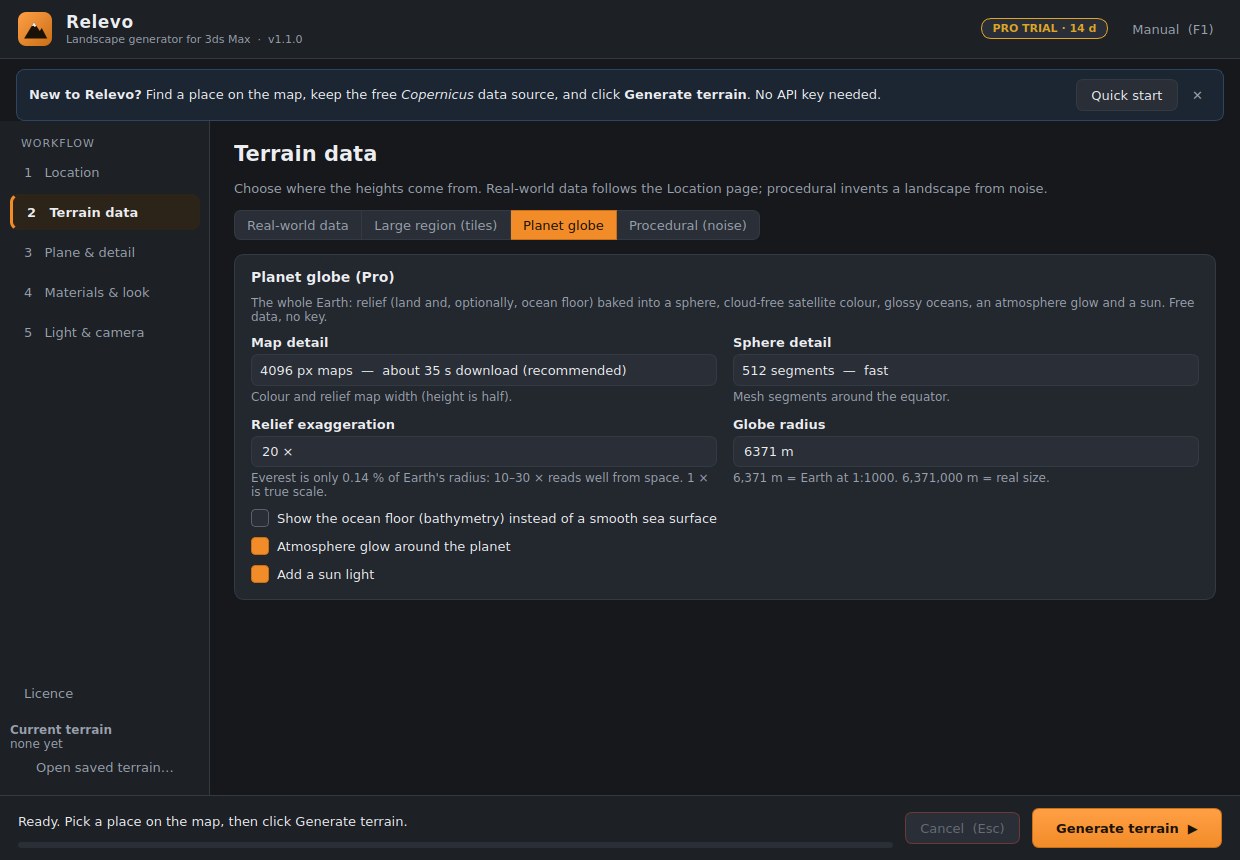
Choose Planet globe at the top of 2 Terrain data and click Generate terrain. It builds the whole Earth for space, flyover and title-sequence shots:
RV_Globe, a sphere with the relief built into its vertices. Longitude 0° faces +X, 90°E faces +Y, and the North Pole is +Z.- Cloud-free Sentinel-2 satellite colour, glossy oceans and rough land (a roughness map), and a normal map for fine relief shading. All are equirectangular maps you can reuse.
RV_Globe_Atmosphere, a thin shell that glows blue at the limb, and a sun light, all on the layer Relevo Globe.
| Setting | What it does |
|---|---|
| Map detail | 4096 px maps (about 35 s download), 8192 px (sharper, 2–3 min) or 2048 px (quick test). |
| Sphere detail | Mesh segments around the equator: 256, 512 or 1024. |
| Relief exaggeration | Everest is only 0.14 % of Earth's radius, so 10–30 × reads well from space. 1 × is true scale. |
| Globe radius | 6,371 m is Earth at 1:1000, which works well in most scenes. 6,371,000 m is real size. |
| Show the ocean floor | Keeps the bathymetry (trenches and mid-ocean ridges) instead of a smooth sea. |
Plane & detail
The terrain is a real-size Plane object named RV_Terrain. It has a TurboSmooth modifier that sets the level of detail, and it is displaced by the height map. Step 3 Plane & detail controls how much geometry the viewport and the render get.
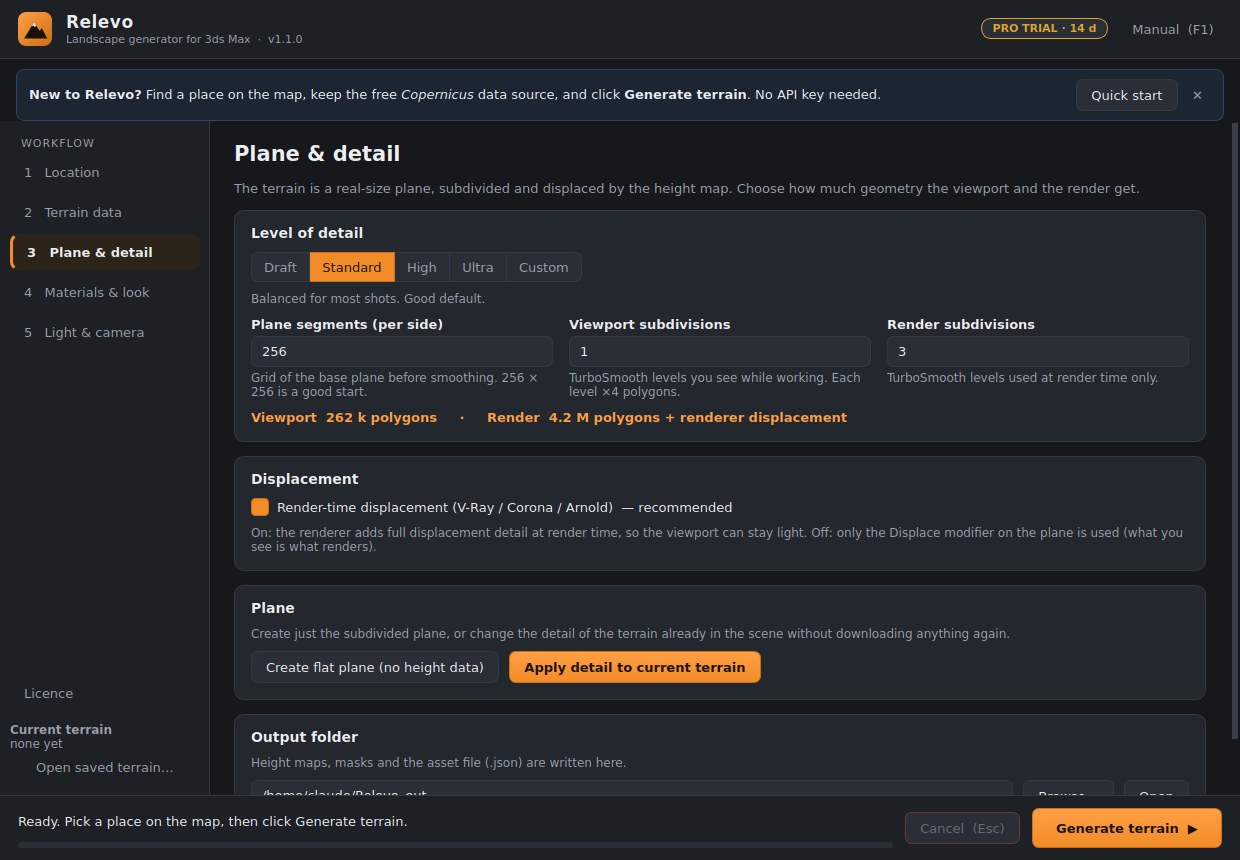
| Level of detail | Plane segments | Viewport / render subdivisions | Use it for |
|---|---|---|---|
| Draft | 128 × 128 | 0 / 2 | Layout and camera work on slower machines. |
| Standard | 256 × 256 | 1 / 3 | Most shots. The default. |
| High | 512 × 512 | 1 / 3 | Close-ups, or when not using render-time displacement. |
| Ultra | 768 × 768 | 1 / 3 | Hero renders. |
| Custom | Set your own values. Editing any number switches to Custom. | ||
- Plane segments (per side): the grid of the base plane.
- Viewport subdivisions: the TurboSmooth levels you see while working. Each level multiplies the polygons by 4.
- Render subdivisions: the TurboSmooth levels used at render time only.
- The orange line shows the resulting polygon counts. Relevo lowers the viewport level automatically if the viewport would go above about 8 million polygons.
- Render-time displacement (recommended): V-Ray, Corona or Arnold adds full displacement detail at render time, so the viewport can stay light.
- Create flat plane (no height data) creates just the subdivided plane, at the Area size from step 1.
- Apply detail to current terrain changes the segments and subdivisions of the terrain already in the scene, without downloading anything again.
Google key setup
Google is optional. The free sources need no key. If you want Google satellite imagery:
- Go to console.cloud.google.com and create or select a project.
- Billing: link a billing account to the project. Google refuses every Maps request without one, even within the free monthly credit.
- APIs & Services > Library: enable Maps Static API (satellite photo on the terrain). Also enable Maps Elevation API for Google heights, and Map Tiles API for the Satellite HD map type.
- APIs & Services > Credentials > Create credentials > API key. Open the key and set:
- Application restrictions: None, or IP addresses with your public IP. Do not use "Websites (HTTP referrers)": 3ds Max is not a website, so Google rejects referrer-restricted keys.
- API restrictions: Restrict key, and tick the APIs you enabled.
- In Relevo, open 2 Terrain data > API keys, paste the key into Google Maps key, and click Test key. It makes two tiny requests and tells you, per API, whether it works and what is wrong if not. Tick Remember on this computer to keep the key.
RELEVO_GMAPS_KEY. The key is never saved in your .max file.Procedural terrain
Invented landscapes from noise, with no internet needed. In 2 Terrain data, choose Procedural (noise).
| Setting | What it does |
|---|---|
| Noise type | Simplex is smoother, with no grid artefacts. Perlin is the classic look. |
| Variation (seed) | The same number with the same settings gives the same landscape. Random picks a new one. |
| Terrain size / Highest peak | Real-world scale of the tile. |
| Sharp alpine ridges | Ridged noise gives knife-edge ridges instead of rounded hills. |
| Number of big features | 1 to 2 gives one massif; 4 or more gives many hills. |
| Detail layers, Detail scale step | How much fine detail is stacked on top. 8 layers with a step of 2 is plenty. |
| Roughness | 0.4 is smooth, 0.5 natural, and 0.6 or more rugged. |
| Natural bending | Twists the shapes so they look less regular. 0.2 to 0.6. |
| Erosion passes | Slopes settle and scree collects. 40 to 150; 0 turns it off. |
Materials & look
A look turns a bare terrain into a photoreal one. It analyses the terrain (slope, height, curvature, water flow, sun exposure), builds masks from that, and layers real PBR materials (rock, scree, grass, soil, snow, sand) in a V-Ray blend material with displacement.
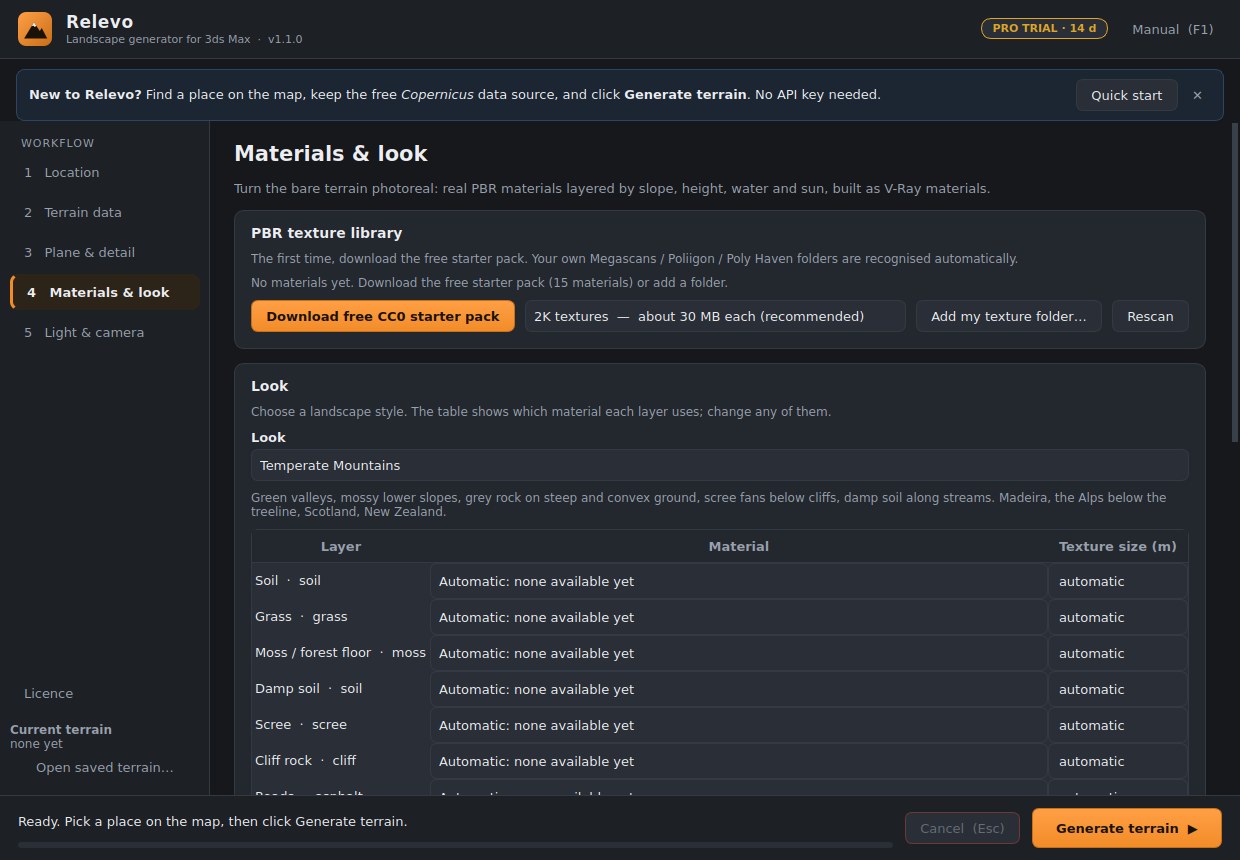
- PBR texture library. Click Download free CC0 starter pack once: 15 materials from ambientCG, about 30 MB each at 2K. You can cancel and resume. Add my texture folder… adds your own sets; Megascans, Poliigon, Poly Haven and similar sets are recognised automatically.
- Look: Temperate Mountains, Alpine, Desert Canyon, Volcanic, or Coastal / Mediterranean. The table shows which material each layer will use. Change any layer with its drop-down, and set its Texture size (metres per texture repeat, or automatic).
- Close-up detail switches V-Ray displacement to full 3D, for ground-level cameras. It is slower.
- Click Apply look. A preview appears in the card. The V-Ray material, masks and a report are written next to the terrain.
Material Editor
Every terrain material Relevo creates is added to the 3ds Max Material Editor, with each texture in its own named slot so you can inspect and change it:
- Slate Material Editor gets a view named Relevo. It holds the terrain material with its whole map tree, plus the slope map and the OpenStreetMap masks as loose nodes you can wire into your own networks. The view is replaced on every build.
- Compact Material Editor: the material goes into a free sample slot. Relevo never overwrites a material you made yourself.
| Slot (basic terrain material) | Texture |
|---|---|
| Base Color | RV_Albedo: the satellite photo, if you chose one. Otherwise a neutral ground colour. |
| Bump | RV_Normal through a Normal Bump map: full-resolution terrain normals. |
| Displacement | RV_Height: the slot is filled but switched off, because the Displace modifier or V-Ray displacement already moves the geometry. |
| Loose nodes | RV_Slope, and RV_Mask_… for roads, water, forest and other OSM masks. |
After Apply look, the layered V-Ray material replaces it in the same places, with a Bitmap node for every layer and mask. The Material Editor card on step 4 has:
- a checkbox to turn the automatic update off;
- Send terrain material now;
- Open Slate Material Editor.
Lighting & camera
- Sun azimuth / elevation: a low sun (5 to 20 degrees) from the side shows relief best.
- Turbidity: 2 gives a crisp, clear sky and 6 a hazy one. Visibility sets the distance of the aerial haze, which is what makes a landscape read as big.
- Apply sun, sky and haze creates a V-Ray Sun with a V-Ray Sky environment and aerial perspective (requires V-Ray).
- Create hero camera places
RV_Cameraabout 110 degrees from the sun for side light, framed on the terrain.
Vegetation scatter (Chaos Scatter)
Select your own grass, shrub, tree or rock models in the scene. Then, on 4 Materials & look, click Use selection as grass (or shrubs, trees, rocks) before Apply look. Relevo creates Chaos Scatter objects that use the look's masks, so trees grow in damp valleys and not on cliffs, and rocks gather below steep faces. Scatter needs Pro.
Rendering tips
- For wide shots, use V-Ray's 2D displacement (the default). Use Close-up detail only for ground-level cameras.
- Use a real-world scale camera: 35 to 85 mm lenses flatten mountains nicely.
- If the terrain looks like a model, it is almost always missing haze: increase Visibility distance or turbidity a little.
- For a camera near the ground, use at least 4096 px heightmaps and Micro-detail 2 to 5 m, or OpenTopography 1 m data where available.
- Relevo > V-Ray Diagnostics writes a file for support if a V-Ray setting is not applied.
Cancel & the Esc key
Cancel is always available while something runs: terrain generation, material downloads, Apply look and the key test.
- Click Cancel (Esc), or press Esc while the Relevo panel is the active window.
- The panel is usable again immediately. Change settings and click Generate again.
- Nothing half-finished is added to your scene. Any result that arrives after you cancelled is discarded.
- Closing the panel also cancels the running job.
If that .NET error window keeps coming back
- Click Continue a few times. If it stops, save your scene with a new name (File > Save As) straight away and restart 3ds Max.
- If it keeps reappearing, 3ds Max cannot recover. Open Task Manager (Ctrl+Shift+Esc), select 3ds Max and click End task.
- Restart 3ds Max. Your latest autosave is in
Documents\3ds Max <version>\autoback. Open the newestAutoBackup*.max.
Troubleshooting
When something fails, Relevo shows a window with what went wrong and what to do. Show Details… in that window has the technical message, and Open manual brings you here. Everything is also written to the log (Relevo > Open Log Folder, file relevo.log).
| Symptom | Fix |
|---|---|
| No Relevo menu | Restart 3ds Max after installing. Check that %APPDATA%\Autodesk\ApplicationPlugins\Relevo_<version>.bundle exists. In 3ds Max 2023 and 2024 the menu is added to the classic menu bar; in 2025 and later it is added through the Menu Editor system, before Help. Open the MAXScript Listener (F11) and look for lines starting with "Relevo:". |
| "Relevo did not start correctly" | Run the installer again. If it persists, send the Listener text and the log. |
| Generate seems stuck | Watch the status line: downloads show progress per tile. Click Cancel, reduce Extent or the pixel sizes, and try again. Check your internet connection or proxy. |
| Google imagery fails | Click Test key (2 Terrain data > API keys) and follow Google key setup, or set Satellite photo to No photo. |
| Terrain is flat or spiky | After every build, Relevo measures the terrain's real height in the scene. If the Displace modifier did not raise it, Relevo writes the heights straight into the mesh, and the log says so ("Heights baked into the mesh"). A terrain that is still flat usually means the area is sea, or the Area size is smaller than about 1,000 m for 30 m data. Spikes are gaps in the data: try another elevation source. |
| Map stays grey | Map tiles could not load. Check the internet connection, firewall or proxy, or try another map type. The map is optional: typing coordinates still works. |
| Satellite HD shows a message instead of imagery | Your Google key needs the Map Tiles API enabled, with billing on. Or use the free Satellite map type. |
| Material not in the Material Editor | On step 4, check that Add materials … automatically is ticked, or click Send terrain material now. In Slate, pick the Relevo view tab. |
| Look is grey or pink in the render | Materials are missing on disk. Click Rescan, or download the starter pack again. |
| 3ds Max is slow after building | Lower Viewport subdivisions (0 or 1) and Base segments. The render uses V-Ray displacement, so the viewport mesh can stay light. |
Error messages
| Title in the error window | Meaning and fix |
|---|---|
| Google refused the satellite-imagery request | The key is not allowed to use the Maps Static API: the API is not enabled, billing is off, or the key restrictions are wrong. See Google key setup, or set Satellite photo to No photo. |
| The data service rejected the API key | Wrong or restricted key, or the API is disabled. Check the key, the enabled APIs, billing and restrictions. |
| Daily quota or billing limit reached | Try again tomorrow, raise the quota, or use copernicus. |
| The service is rate-limiting requests | Relevo already retried automatically. Wait a minute, or reduce the sample and pixel sizes. |
| This job would make too many paid requests | The per-job safety cap. Reduce Photo resolution, Elevation points per side, or the Area size. |
| OpenTopography needs an API key | Free key from opentopography.org, or use copernicus. |
| OpenStreetMap data could not be downloaded | The public OSM servers are busy. Retry later, use a smaller area, or untick OSM. |
| Network problem | No connection, or blocked by a firewall, VPN or proxy. 3ds Max must be allowed internet access. |
| Pro feature | Activate a licence, or stay within the Free features. |
| No PBR materials yet | Download the starter pack or add a texture folder. |
| V-Ray not found | Install or enable V-Ray. Looks are applied as a baked texture meanwhile. |
| A setting is out of range | Check the value named in the details. |
| Something went wrong | Unexpected. Run the Self-Test and send relevo.log. |
Relevo for Cinema 4D
The Cinema 4D edition uses the same data engine as the 3ds Max edition: Auto elevation with national LiDAR, Copernicus, OpenTopography, your own DEMs, Google satellite photos, OpenStreetMap, large regions, the planet globe, procedural terrain and the Looks. One licence works in both applications on the same computer.
Requirements
- Cinema 4D 2023.2 or later (2024, 2025, 2026 and newer), on Windows 10/11 (64-bit) or macOS 12 or later (Apple silicon or Intel). Cinema 4D 2023.0 and 2023.1 are not supported; update to 2023.2, which is a free update.
- Optional: V-Ray 6 or 7 for Cinema 4D. Without it, Relevo makes Cinema 4D Standard materials, which render in the Standard and Physical renderers.
Install
- Which download: C4D2024-2026 is for Cinema 4D 2024, 2025 and 2026; C4D2023 is for Cinema 4D 2023.2. On a Mac, pick AppleSilicon (M1 and later) or Intel (Apple menu > About This Mac shows the chip). If you use two Cinema 4D generations, install both downloads: they share one folder and add up.
- Windows: close Cinema 4D and run
Relevo_1.1.0_C4D2024-2026_Windows_Setup.exe(or the C4D2023 one). It installs to%LOCALAPPDATA%\Programs\Relevo C4Dand adds that folder to Cinema 4D's plugin search path (theg_additionalModulePathsetting), so every installed Cinema 4D version finds it, including versions you install later. - macOS: double-click the download (
…_macOS_AppleSilicon.zipor…_macOS_Intel.tar.xz) to unpack it, then double-click Install Relevo.command. It copies the plugin to~/Library/Application Support/Relevo/C4D/Relevo, clears the download quarantine flag on the included libraries, and links it into thepluginsfolder of every Cinema 4D version on the Mac. Run it again after installing a new Cinema 4D version, or add the folder in Settings > Plugins. If macOS says the script cannot be opened, right-click it and choose Open. - Manual install (both): copy the
Relevofolder anywhere, then in Cinema 4D open Edit > Preferences > Plugins, click Add Folder…, choose the folder that containsRelevo, and restart Cinema 4D.
After restarting Cinema 4D, open Extensions > Relevo > Relevo Run Self-Test once. The panel is Extensions > Relevo > Relevo. It is dockable: drag its title bar into your layout and save the layout.
The panel
- 1 Location: search for a place or paste coordinates or a Google Maps link, pick one of the famous places, or click the map. Click puts the terrain there, drag pans, Shift + drag draws a new area and the wheel zooms. The orange square is what will be built.
- 2 Terrain: choose what to build (a real place, a large region, the whole planet or a procedural landscape) and where the data comes from. Auto is the best free choice.
- 3 Mesh & Look: level of detail, render subdivision, which renderer the materials are for, scene scale, and the Look.
- 4 Keys & Licence: Google and OpenTopography keys (only if you use those services), and your licence.
- Click Generate. Cancel stops the download at any time; your scene is only changed once the data is ready.
How the terrain is built
- Heights are baked into the mesh.
RV_Terrainis a polygon object whose points carry the real heights, so the viewport shows exactly what renders, in every renderer, with no displacement settings. Detail finer than the mesh is added by a detail normal map that holds only the relief the mesh cannot show, so slopes are not shaded twice. - Level of detail: Draft 256 × 256, Standard 512 × 512, High 1024 × 1024 and Ultra 2048 × 2048 polygons. Change detail of RV_Terrain rebuilds the mesh at a new level without downloading again, and keeps its material. Render subdivision (1–3) puts the terrain under a Subdivision Surface that only subdivides at render time.
- Axes: +X is east, +Y is up, +Z is north, and the terrain is centred on the origin. With Place at true altitude, the lowest point sits at its real height above sea level.
- Units: Relevo reads Project Settings > Scale and builds at real size (1 m = 100 units in a default centimetre scene). Use Scene scale (1:10, 1:100, 1:1000) for very large terrains, regions and globes, and raise the viewport clipping (Project Settings > View Clipping: Huge) if distant parts disappear.
- Materials: Automatic makes V-Ray materials when the document renders with V-Ray and Standard materials otherwise. Render with V-Ray switches the render settings to V-Ray. For Redshift, Octane or Corona, the colour and normal maps are in the output folder (
*_albedo.png,*_look_albedo.png,*_detail_normal_*.png) and plug straight into their materials. - Looks (Pro): the chosen look is baked into one colour map from real PBR textures, blended by slope, height, water and sun. Choose a look before you click Generate, or apply it later with Apply look to RV_Terrain. Download the free CC0 materials once for the full looks.
- OpenStreetMap (Pro): buildings (walls and roofs as separate materials through a Roofs polygon selection), road meshes and linear splines for roads, rail and rivers go under the
RV_OSMnull. - Regions are built under the
RV_Regionnull, one polygon object per tile, with shared edges. The globe goes underRV_Globe_Group: north is +Y and longitude 0° faces +X. - Each object has an Annotation tag named Relevo with its data sources, attribution and asset file. It travels with the .c4d file.
Files and settings
Maps are written to the Output folder: by default the tex/Relevo folder next to your saved .c4d file, or Documents/Relevo for an unsaved scene. Settings, the licence and the material library are shared with the 3ds Max edition (%APPDATA%\Relevo on Windows, ~/.config/Relevo on macOS). Logs are in Extensions > Relevo > Relevo Open Log Folder, and Create Support File zips them for support without any keys.
Cinema 4D troubleshooting
| Symptom | What to do |
|---|---|
| No Relevo in the Extensions menu | Check that the plugin folder is listed in Preferences > Plugins (or reinstall), then restart. The console (Extensions > Console) shows the reason if the plugin failed to load. |
| Self-Test says a library is NOT AVAILABLE | Another plugin may have installed an incompatible NumPy into Cinema 4D's Python. Send the support file; Relevo's own libraries are in Relevo/libs. |
| macOS: "cannot be opened because the developer cannot be verified" | Run Install Relevo.command again (it removes the quarantine flag), or in Terminal: xattr -dr com.apple.quarantine ~/Library/Application\ Support/Relevo/C4D. |
| Parts of a big terrain disappear in the viewport | Set Project Settings > View Clipping to Huge, or use a smaller Scene scale. |
| The terrain looks black in Redshift | Redshift does not render Standard materials. Use the maps from the output folder in a Redshift material. |
Licence, trial & updates
- Free, forever, including commercial work: procedural terrain, real-world terrain up to 2048 px (Copernicus, AWS), plane and level-of-detail controls, the map, Famous places and Material Editor slots.
- Trial: the first 14 days include every Pro feature.
- Pro: V-Ray looks and PBR materials, Chaos Scatter, OpenStreetMap, national LiDAR (Auto), OpenTopography and local LiDAR, maps above 2048 px, large regions and the planet globe.
Activating
- Open Licence (the badge at the top right of the panel, or the sidebar).
- Paste the key from your purchase e-mail and click Activate. Store keys (like
38b1460a-5104-…) are activated online once per computer. OfflineRV1-…keys from your seller need no internet.
- Perpetual licences work forever and include a year of updates. When a new version comes out after your updates end, the Licence page says so and offers Renew maintenance. The version you have keeps working. Enter a renewal key the same way as a licence key.
- Subscriptions work while they are paid, with a 7-day grace period for late renewals.
- Your licence is re-checked in the background every few days and keeps working for 45 days without internet. Check licence now re-checks immediately.
- To move to another computer, click Remove licence from this computer. This frees the seat online, and you can then activate on the new computer.
- Activation sends only your key and an anonymous machine identifier. No computer name, user name or project data leaves your machine.
Updates
Relevo checks once a day, in the background, whether a newer version exists. If it does, an Update … available button appears at the top of the panel. Relevo > Check for Updates checks immediately. Install an update by running its installer over the current version; your settings, licence and materials are kept.
Getting help
Relevo > Create Support File puts a zip on your Desktop with the logs and system details support needs, never your licence or API keys. Attach it to your support e-mail.
The panel remembers your settings between sessions (location, sources, detail, look, lighting). API keys are only kept if you tick Remember on this computer.
Data sources & credits
| Data | Licence | Credit to include |
|---|---|---|
| Copernicus DEM GLO-30 | Free, commercial use allowed | © DLR e.V. 2010-2014 and © Airbus Defence and Space GmbH 2014-2018, provided under COPERNICUS by the European Union and ESA |
| AWS Terrain Tiles | Mixed open licences | See the Mapzen/Tilezen terrain tiles attribution |
| OpenStreetMap | ODbL | © OpenStreetMap contributors |
| ambientCG materials | CC0 | None required (appreciated: ambientCG.com) |
| National elevation (Auto) | Public domain / CC0 / CC BY 4.0 / OGL / Licence Ouverte / swisstopo OGD | Written into each terrain's credits automatically; see Auto |
| Globe colour | Sentinel-2 cloudless 2016 by EOX, CC BY 4.0 | Sentinel-2 cloudless 2016 by EOX IT Services GmbH, contains modified Copernicus Sentinel data 2016 |
| Map window tiles | OSM ODbL, EOX Sentinel-2 cloudless 2016 CC BY 4.0 | Shown on the map; used for navigation only |
| Google Maps | Google Maps Platform Terms | The terms restrict building terrain models from Google data and caching it. Get written approval before client work. |
Each build also writes the credits for the data it used into <name>.json.
FAQ
Do I need a Google API key?
No. Copernicus elevation, the free map types and the Look system need no key and give the best photoreal results.
Can I keep working in 3ds Max while it generates?
Yes. Downloads run in the background. Don't press Esc in the viewport while it runs (see Cancel & the Esc key).
Where are my files?
Relevo > Open Output Folder, or Open next to the output folder on step 3. By default this is <project>\sceneassets\images\Relevo.
Can I just get a subdivided plane?
Yes: step 3, Create flat plane (no height data).
How do I rebuild with different settings?
Change the settings and click Generate again. To change only the mesh density, use Apply detail to current terrain on step 3; nothing is downloaded again.
Why is my terrain offset or at the wrong place?
Check the sign of the coordinates: west longitudes and south latitudes are negative. The map window shows exactly where the box is.